
Odoo 18 is an open-source suite of business applications that provides a complete ERP (Enterprise Resource Planning) solution for organizations of various sizes. It offers a wide range of integrated tools and modules to help manage all aspects of a business, such as finance, sales, inventory, human resources, and more.
The open-source community edition is free, making it accessible to small businesses and developers. The enterprise edition, on the other hand, offers additional features, services, and support.
Odoo is highly customizable. Businesses can tailor modules to meet their specific needs, create custom workflows, or build entirely new apps using Odoo’s development framework.
In summary, Odoo is a versatile business management software that can streamline operations and provide real-time insights, making it an ideal solution for companies looking to optimize their business processes.
In this tutorial, we will show you how to install Odoo 18 on a Ubuntu 24.04 OS.
Step 1: Update Operating System
Update your Ubuntu 24.04 operating system to make sure all existing packages are up to date:
# apt update && apt upgradeThen install all the required packages for the Odoo 18 setup on the Ubuntu 24.04 OS.
# apt install python3-minimal python3-dev python3-pip python3-venv python3-setuptools build-essential libzip-dev libxslt1-dev libldap2-dev python3-wheel libsasl2-dev node-less libjpeg-dev xfonts-utils libpq-dev libffi-dev fontconfig git wgetStep 2: Install PostgreSQL
Odoo uses PostgreSQL as a database backend, so you will need to install PostgreSQL on your server.
Follow these steps to install and configure PostgreSQL server:
# apt-get install postgresqlAfter the successful installation, start the PostgreSQL service and enable it to start after the system reboot:
# systemctl start postgresql
# systemctl enable postgresql
Verify that is active and running on your server:
# systemctl status postgresqlOutput
● postgresql.service - PostgreSQL RDBMS
Loaded: loaded (/usr/lib/systemd/system/postgresql.service; enabled; preset: enabled)
Active: active (exited)
Main PID: 19754 (code=exited, status=0/SUCCESS)
CPU: 2ms
Now create an Odoo user in PostgreSQL:
# su - postgres -c "createuser -s odoo" This will add a new role odoo in the PostgreSQL server.
Step 3: Install Node.js
To install Node.js and npm on your Ubuntu 24.04 OS use the following command:
# apt install nodejs npmAlso, install the following module to enable RTL support:
# npm install -g rtlcssStep 4: Installation of wkhtmltopdf
To generate PDF reports successfully, wkhtmltopdf is necessary. PDF reports are a crucial component of any organization.
First install the xfonts dependency before installing wkhtmltopdf:
# apt-get install xfonts-75dpi xfonts-baseNow download and install wkhtmltopdf using the following commands:
# wget  http://security.ubuntu.com/ubuntu/pool/universe/w/wkhtmltopdf/wkhtmltopdf_0.12.6-2build2_amd64.deb
# dpkg -i wkhtmltopdf_0.12.6-2build2_amd64.deb
Verify if the wkhtmltopdf installation is successful by checking the version:
# wkhtmltopdf --version
wkhtmltopdf 0.12.6
Step 5: Create an Odoo User
Create a new system user for managing the Odoo processes on the Odoo server.
# adduser --system --group --home=/opt/odoo --shell=/bin/bash odooStep 6: Install Odoo 18
Switch to the user that you have created before to avoid encountering issues related to access rights.
# su - odooNow, download the Odoo 17 source code from the git repository and install it:
# git clone https://www.github.com/odoo/odoo --depth 1 --branch 18.0 /opt/odoo/odooNext run the following command to generate a new Python virtual environment.
# python3 -m venv odoo-envActivate the virtual environment with the following command:
# source odoo-env/bin/activateThen install the required Python packages:
(odoo-env) $ pip3 install wheel
(odoo-env) $ pip3 install -r odoo/requirements.txt
After completing the process of installing all requirements to deactivate the virtual environment run the following command:
(odoo-env) $ deactivateExecute the following command to create a directory for custom addons:
# mkdir /opt/odoo/custom-addonsNext exit from the Odoo user:
# exitCreate an Odoo log directory and provide it the required write permissions.
# mkdir /var/log/odoo18
# chown odoo:odoo /var/log/odoo18
Step 7: Create Odoo Configuration File
Create the Odoo configuration file.
# nano /etc/odoo.confThen paste the following configuration into it.
[options]
admin_passwd = Strong_admin_Password
db_host = False
db_port = False
db_user = odoo
db_password = False
logfile = /var/log/odoo18/odoo-server.log
addons_path = /opt/odoo/odoo/addons,/opt/odoo/custom-addons
xmlrpc_port = 8069
Remember to update the value of the “Strong_admin_Password” key above with a more secure password.
Step 8: Create a Systemd Service File
Create a systemd service file to manage the Odoo service:
# nano /etc/systemd/system/odoo.servicePaste the following content into the odoo.service file:
[Unit]
Description=Odoo
Requires=postgresql.service
After=network.target postgresql.service

[Service]
Type=simple
SyslogIdentifier=odoo
PermissionsStartOnly=true
User=odoo
Group=odoo
ExecStart=/opt/odoo/odoo-env/bin/python3 /opt/odoo/odoo/odoo-bin -c /etc/odoo.conf
StandardOutput=journal+console

[Install]
WantedBy=multi-user.target
Reload system daemon and start the service:
# systemctl daemon-reload
# systemctl start odoo
# systemctl enable odoo
To confirm everything is working normally, check the status of service:
# systemctl status odooOutput:
● odoo.service - Odoo
     Loaded: loaded (/etc/systemd/system/odoo.service; enabled; preset: enabled)
     Active: active (running)
   Main PID: 21764 (python3)
      Tasks: 4 (limit: 2218)
     Memory: 73.3M (peak: 73.5M)
        CPU: 973ms
     CGroup: /system.slice/odoo.service
             └─21764 /opt/odoo/odoo-env/bin/python3 /opt/odoo/odoo/odoo-bin -c /etc/odoo.conf
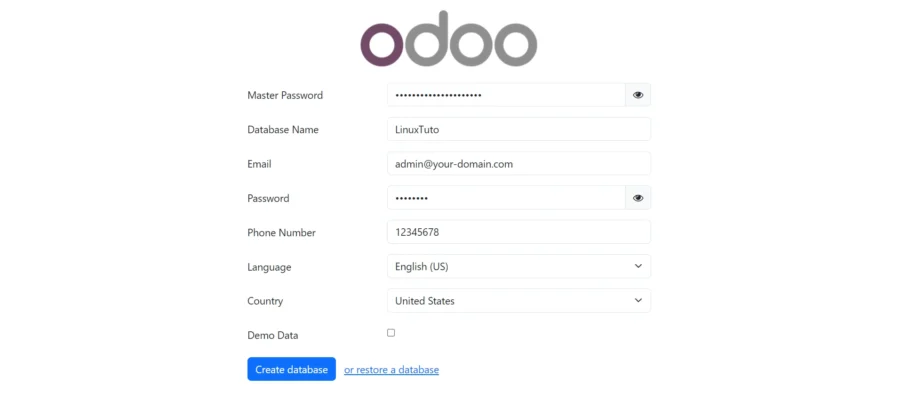
Step 9: Access Odoo 18 server
Open your web browser and type http://your-IP-address:8069 and you will see the following screen:
Comments and Conclusion
That’s it. You have successfully installed Community version of Odoo 18 on Ubuntu 24.04.
For additional help or useful information, we recommend you to check the official Odoo 18 documentation.
If you have any questions please leave a comment below.