Cloudflare Tunnels is a service offered by Cloudflare that allows you to securely expose web services running on your local machine or private network to the internet without needing to open ports, set up firewalls, or use a public IP address.
It creates a secure, encrypted tunnel between your origin server and Cloudflare’s network, enabling access to your applications from anywhere.
In this tutorial we will show you how to configure Cloudflare Tunnel on Ubuntu 24.04.
Step 1: Install and Configure Cloudflared
To create and manage tunnels, you will need to install and authenticate cloudflared on your server.
You can install cloudflared with the following command:
# wget -q wget https://github.com/cloudflare/cloudflared/releases/latest/download/cloudflared-linux-amd64.deb
# dpkg -i cloudflared-linux-amd64.deb
After installing cloudflared, you need to authenticate it with your Cloudflare account:
# cloudflared tunnel loginYou will get the following message:
Please open the following URL and log in with your Cloudflare account:
https://dash.cloudflare.com/argotunnel?aud=&callback=https%3A%2F%2Flogin.cloudflareaccess.org%2F94jJEwKkBV3dOOKv5oPBEj-B9lWITbj_Gk_9sVN1wnw%3D
Leave cloudflared running to download the cert automatically.
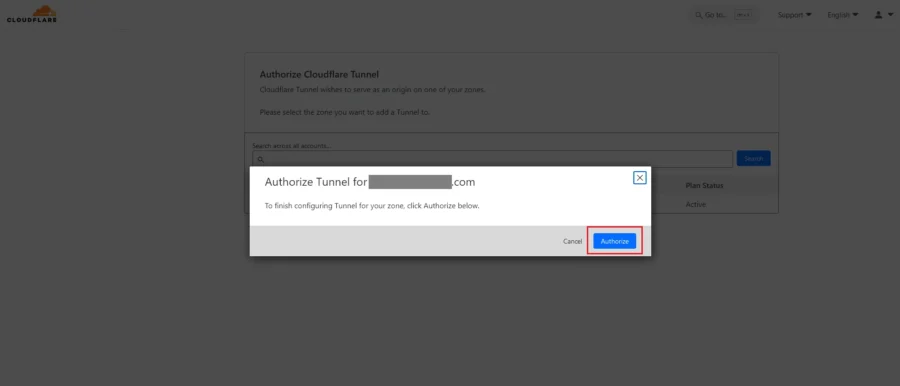
Copy the URL and log in to your Cloudflare account. Once you logged in you will get the following message:

Click on the Authorize button to authorize the tunnel. Cloudflare will download a certificate file to authenticate cloudflared with Cloudflare’s network.
You have successfully logged in.
If you wish to copy your credentials to a server, they have been saved to:
/root/.cloudflared/cert.pem
Once authorization is completed successfully, your cert.pem will be download to the default directory.
Step 2: Create a Cloudflare Tunnel
Now, you are ready to create a Cloudflare Tunnel that will connect cloudflared to Cloudflare’s edge. Running the following command will create a Tunnel:
# cloudflared tunnel create yourtunnelNote: Replace yourtunnel with a name of your choice.
Next, you need to configure the tunnel to point to your local web server. The configuration file contains keys and values, which is written in YAML syntax.
# nano /root/.cloudflared/config.ymlYou have to include the correct tunnel ID and credentials file gotten from the tunnel creation command.
tunnel: b8294c45-9cd1-40fe-b8f1-519da5d8dfd9
credentials-file: /root/.cloudflared/b8294c45-9cd1-40fe-b8f1-519da5d8dfd9.json
ingress:
- hostname: test.yourdomain.com
service: http://localhost:80
- service: http_status:404
Next, you have to configure your DNS settings on your Cloudflare account by adding a CNAME record.
Also, you can use this command will generate a CNAME record that points to the subdomain of a specific Tunnel.
# tunnel route dns b8294c45-9cd1-40fe-b8f1-519da5d8dfd9 test.yourdomain.comStep 3: Start and Manage the Cloudflare Tunnel
By default, the tunnel expects to find the configuration file in the default directory, /root/.cloudflared/config.yml but to run tunnel as a service, you might need to move the config.yml file to the /etc/cloudflared/ directory.
# mkdir /etc/cloudflared/
# mv /root/.cloudflared/config.yml /etc/cloudflared/
Then, you have to install the tunnel as a service:
# cloudflared service installNow, we can start and enable the cloudflared service so that it runs in the background and starts automatically upon server boot.
# systemctl start cloudflared
# systemctl enable cloudflared
You can verify the status of the cloudflared service using the systemctl status command:
# systemctl status cloudflaredOutput:
● cloudflared.service - cloudflared
Loaded: loaded (/etc/systemd/system/cloudflared.service; enabled; preset: enabled)
Active: active (running)
Main PID: 2316 (cloudflared)
Tasks: 7 (limit: 2218)
Memory: 14.0M (peak: 16.1M)
CPU: 9.227s
CGroup: /system.slice/cloudflared.service
└─2316 /usr/bin/cloudflared --no-autoupdate --config /etc/cloudflared/config.yml tunnel run
Step 4: Add more services (optional)
If we have multiple services using the same tunnel, you have to create separate CNAME entries for each hostname.
# cloudflared tunnel route dns <UUID or NAME> test2.yourdomain.comThen Add another ingress point to the config:
ingress:
- hostname: test.yourdomain.com
service: http://localhost:80
- hostname: test2.yourdomain.com
service: http://localhost:8080
- service: http_status:404
Comments and Conclusion
That’s it. You have successfully Configure Cloudflare tunnel on Ubuntu 24.04
For additional help or useful information, we recommend you to check the official Cloudflare Tunnel documentation.
If you have any questions please leave a comment below.
r
